When I started wood carving, I used to lump all types of carving into the same bucket. Twenty years into wood carving, I understand that there are many different types of carving practices that produce different types of projects. While whittling has come to represent carving as a whole and chainsaw carving has blown up on TikTok, I feel like one of my favorite carving subcategories doesn’t get enough limelight. And that is incised carving.
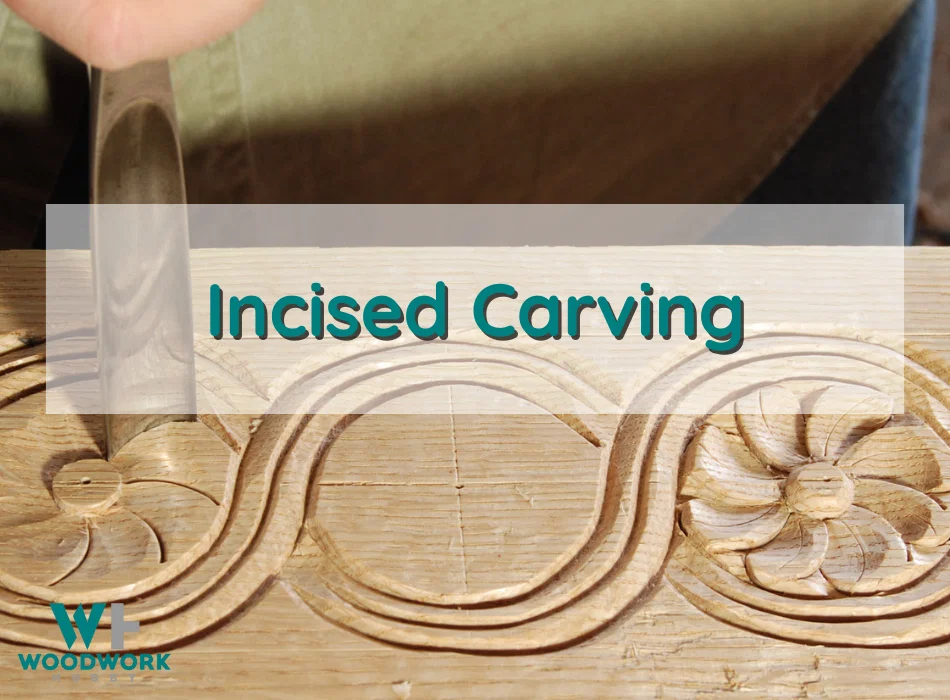
Incised carving is the process of engraving an image into a flat project surface with the help of etching tools. To create an incised carving, one has to hollow out the wood in the shape of the two-dimensional image one intends to create.
In this article, you will find out what incised carving is and how it is different from other flat carving practices like relief carving and laser engraving. By the end of this post, you will know how you can get started with incised carving and will have project ideas that will be easy enough for you to get started right away.
What Is Incised Carving?
An incised carving is an engraving made from hollowing out everything except the borders of a character or a drawing. It uses etching in the negative to produce the final two-dimensional image.
Incised carvings are made in stone, wood, and metal and can range from simple text and stick figures to intricate patterns and like-like images.
Be sure to check out my full guide on all the best wood carving projects for beginners.
The term “incised carving” comes from the incisions required to make the raised carving. Because the carving isn’t raised, it is often not considered a relief carving. That said, an incised carving is a type of relief carving that is engraved into a flat wood surface.
Incised Carving Vs. Relief Carving
Incised wood carving is a carving in which the image is engraved into the material, while a relief carving is one where the project material is etched away to create a raised, flat image. In both instances, the engraving process is on a flat surface.
In both carving projects, the material is subtracted unidimensionally. But when it comes to relief carvings, the background is etched away, leaving behind a raised image. On the other hand, incised carvings are hollowed out in the shape of the image, producing a sunken impression.
Both carvings use similar skill sets but differ in a few ways beyond the raised and sunken profiles.
How Does Incised Carving Differ From Relief Carving?
Incised carving is hollowed out while a relief carving is raised. The two types of carvings also differ in value, ease of creation, and compatible wood types, among other things.
Let’s explore how these carving types differ.
- An incised carving is easier – While the specific project determines the exact level of difficulty of any project, incised carvings are usually easier to pull off compared to relief carvings with the same details. That is because you need to subtract more project material to create the same image as a raised relief project.
- Relief carving takes more time – Because relief carvings require more etching and shaving, they take more time to make compared to hollow relief. For a dove etching, the incised carving needs to be an outline of the bird etched into a flat surface. For a dove relief, everything except the dove needs to be carved away.
- Drawing skills can translate to incised carving – Basic incised carvings are just drawings etched into a flat surface. People who are good at sketching, therefore, can be very good at producing incised carvings.
- You need more tools for relief carving – Relief carving requires a wider variety of chisels, gouges, and knives to create. After all, it has far more nuance than a flat engraving.
- You can turn relief carving skills for carving in the round – Finally, you can master relief carving and apply the same skills to the modeling and detailing aspects of carving in the round. Etching brilliance doesn’t really translate to the “rounding” aspect of carving in the round, though it can help with finer details.
Wood carving is being taken up by many people but I often get asked about the costs. I decided to write this article on is wood carving an expensive hobby?
When Is Incised Carving Used?
Incised carving is used to make art, communicate a message, or produce a sign. Historically it has been used in record-keeping as well, with the Egyptian hieroglyphics being the most famous examples of such carvings.
Incised carvings that are deep enough can be used for screenprinting, but they venture into the territory of dye cuts. The most common use of standard incised carvings is display art. And as is the case with most display art media, incised carvings can also be made with computer technology.
Printing An Incised Carving
Because an incised carving is flat and follows the path of a drawing, it can be replicated with a computed-aided engraving tool. You can recreate incised carvings with Aufero Laser Engraver, which is a 2-dimensional engraving printer.
However, laser-engraved images aren’t usually referred to as incised carvings. They are called laser carvings and are very easy to detect as machine-made. Laser carvings are also priced lower than handmade art. To make incised carvings with your hands, you need carving tools and not printers.
What Carving Tools Are Needed For Incised Carving?
Traditional carving tools are needed for incised carvings. These include Chisels, Carving Knives, Hook Knives, V-Parting Tools, and Gouges, alongside the bent variations of these tools. They all serve different detailing and carving functions.
Here is how each of the tools contributes to incised carving:
- Chisels – Chisels are used to carve away the project material in short progression.
- Bent Chisels – Bent Chisels help shape wood along a curve.
- Carving Knives – Carving knives are used for engraving the outline of an incised carving.
- Hook Knives – Hook knives are great for carving round details into a flat surface.
- V-Parting Tools – V-Parting tools are great for etching straight lines at sharp angles.
- Bent V-Parting Tools – These are perfect for creating curves and roughing out the concave cuts, which is why it is perfect for incised carving.
- Gouges – Gouges help shave wood in a slightly curved manner. Point edges of the gouge can be used for precise engraving as well, which is why it can be useful for incised carving.
- Bent Gouges – For hollow wood that can’t be detailed with a straight gouge, a bent gouge can be used. It is ideal for concave surfaces and, therefore, perfect for incised carving.
Now that you know which tools you need to get started with incised carving, it is time to go over the exact steps in a hollow relief project.
How To Create An Incised Carving?
For new wood carvers, incise carvings can be perfect starting projects as they introduce them to carving projects without putting on the three-dimensional etching pressure. To create an incised carving, you need to outline the image on the wood and etch away what’s not needed. The step-by-step breakdown below will help you understand how to incise a carving.
- Start with an idea – Like all etching projects, the starting point of yours has to be an idea. What doesn’t start with an idea is too abstract to etch accurately.
- Sketch out the idea on a sheet – The sketch not only makes your idea more concrete but also lays the foundation for the outline of the etching.
- Trace the sketch onto a flat wood surface – After you’ve made a sketch, preferably to scale, you need to trace it onto the wood. You can do this with the help of carbon paper or by direct reference tracing.
- Etch the outline onto the wood – After laying the impression on the wood. You need to lightly etch the outline of your idea with a V-shaped diving tool.
- Deepen the outline – Once the initial outline is etched, you can deepen the carving to better embed the overall image.
- Mark the negative space – Aside from the outline of the figures you intend to etch into the wood, there will be negative space. This could be the background that needs to be hollowed out or the body of the figure that will exist as a negative against the raised-wood backdrop.
- Gouge away the negative – Whatever needs to be removed to give a monochrome impression must be etched away at this stage. Often, the background is removed during the gouging phase.
- Finish the project – Clean up the lines and use smoothening passes to give the project a finished feel.
Check out everything you need to know on carving Cedar wood.
Video showing how to incise carving a letter R
Creating incised carving is a repeatable process, but the difficulty of executing the steps above depends on the specific project. Some super-intricate projects require the same steps but with such precision that even I would have a tough time with them. If you mistakenly pick up such a project, you might get frustrated with the challenge.
Incised Carving Projects For Beginners
Picking the right projects is crucial to the education and improvement of your craft. Incised carving takes hours of practice, and simpler projects that feel finished quicker are best for beginners.
They can encourage new wood carvers to continue learning. Below are the top six incised carving projects for novice carvers.
Hollow Heart: A Frameable Starting Project
A hollow heart is very simple to etch out because you don’t even need a sketch or an impression to know the shape to follow along. Lightly carve a heart-shaped outline, and gouge out its interior.
An Alphabet: Easy To Make, Easy To Gift
You have to etch out along more paths when creating the impression of an alphabet. The finished carving can be a gift for someone whose name begins with said letter. You can choose to gouge out the interior of the alphabet or everything except the alphabet.
If you remove the background, the resulting image will be a relief carving instead of a hollow relief.
Dream Catcher: Simple Yet Impressive
Dream catchers are made out of simple shapes overlapping over each other. Etching a dreamcatcher pattern into a flat piece of wood is simple, yet the end result looks impressive. You can choose to make your dream-catching incised carving as detailed as your skill level allows.
Flower: Detailed, But Not Too Difficult
Once you master etching dreamcatchers, you can proceed to carve flowers. Flowers can range from simple two-dimensional icons to hyper-realistic etchings. Again, you have control over the resolution and the detail you want to lend to the hollow relief carving.
Mandala: Flex Your Detailing Skills
Once you’re confident about your detailing skill, you can proceed with mandala carving. Mandalas are complicated and incredibly detailed.
If you make mandalas properly, you will have a hard time not showing off. Creating incised carvings of mandalas is a sign that you’ve become an intermediate engraver.
Bird: Detail As You See Fit
Bird carving is an intermediate project though beginners can carve simple birds on flat wood too.
Again, the level of detail is up to the carver. But it is a great project to approach once you have appropriate detailing skills because you can etch individual feathers on the bird and create an awe-inspiring hollow relief.
Final Thoughts -What Is Incised Carving?
Incised carving is the opposite of relief carving and entails hollowing out project material to create outlines and negative space. Where the background is removed to raise an image in relief carvings, the project outline and interior are removed to create an incised carving.


